
Diagnosing and Monitoring LSI RAID Controllers in a Homelab: The Mystery of Phantom Disks
Discover how I diagnosed mysterious VM failures in my homelab by accessing my LSI RAID controller, identified cascading disk failures across multiple volumes, and developed a monitoring script to prevent future storage catastrophes.
In the world of homelab server management, unexpected hardware issues can turn a weekend project into a troubleshooting marathon. Recently, I encountered a particularly perplexing scenario with my aging but reliable Supermicro X9DRW server where virtual machine disks would mysteriously disappear, causing a cascade of failures across my home infrastructure. This article documents my journey diagnosing these phantom disk failures and implementing a monitoring solution to prevent future surprises.
The Mystery of Vanishing Virtual Machines
It started with what seemed like a routine cleanup - deleting some ancient snapshots from over a year ago to free up space. Little did I know this would trigger a series of catastrophic events throughout my homelab's storage infrastructure.
Shortly after the cleanup, several virtual machines refused to start, greeting me with cryptic error messages:
INTERNAL_ERROR(xenopsd internal error: VM = 1967dfe9-2496-1c97-68e9-20fb5a17a2db; domid = 12; Bootloader.Bad_error Traceback (most recent call last):
  File "/usr/lib64/xen/bin/pygrub-wrapper", line 40, in <module>
    disk_stat = os.stat(disk)
OSError: [Errno 2] No such file or directory: '/dev/sm/backend/dbf5079e-dff2-99c6-f4f1-739d608f491a/49fbcc14-da88-45fe-a91b-4149837c82b1'
)
Running VMs would suddenly freeze with I/O errors in the logs:
SR_BACKEND_FAILURE_453(, tapdisk experienced an error [opterr=Operation not permitted], )Initial Troubleshooting: Software Layer
At first, I thought this might be a simple XCP-NG storage repository issue. I started by checking the backend paths:
ls -l /dev/sm/backend/dbf5079e-dff2-99c6-f4f1-739d608f491a/
total 8
brw-r----- 1 root disk 254, 5 Jan 5 12:45 2f0622b5-3c00-41ad-9aa3-278012a6ac60
-rw-r--r-- 1 root root 1208 Jan 5 12:45 2f0622b5-3c00-41ad-9aa3-278012a6ac60.attach_info
brw-r----- 1 root disk 254, 4 Jan 5 12:45 6d1f6441-cc3f-45e3-91f7-1f35bc7a0977
-rw-r--r-- 1 root root 1208 Jan 5 12:45 6d1f6441-cc3f-45e3-91f7-1f35bc7a0977.attach_info
Some virtual disk mappings were present, but many were missing, including the ones needed for critical VMs.
What made this situation particularly puzzling was that the virtual disks existed in the XCP-NG database. Checking with XenServer commands confirmed this:
xe vdi-list uuid=49fbcc14-da88-45fe-a91b-4149837c82b1
uuid ( RO)             : 49fbcc14-da88-45fe-a91b-4149837c82b1
name-label ( RW)       : 0
name-description ( RW) :
sr-uuid ( RO)          : dbf5079e-dff2-99c6-f4f1-739d608f491a
virtual-size ( RO)     : 10737418240
sharable ( RO)         : false
read-only ( RO)        : false
The disks were properly attached to their VMs according to the database:
xe vbd-list vdi-uuid=49fbcc14-da88-45fe-a91b-4149837c82b1
uuid ( RO)             : 28a7fe9c-8a28-4433-c60f-fd258fb01cf7
vm-uuid ( RO)          : 1967dfe9-2496-1c97-68e9-20fb5a17a2db
vm-name-label ( RO)    : u208-mail01.pl.home
vdi-uuid ( RO)         : 49fbcc14-da88-45fe-a91b-4149837c82b1
empty ( RO)            : false
device ( RO)           : xvda
I tried to forcibly rescan the storage repository:
xe sr-scan uuid=dbf5079e-dff2-99c6-f4f1-739d608f491aAnd attempted to unplug and replug the virtual disks:
xe vbd-unplug uuid=28a7fe9c-8a28-4433-c60f-fd258fb01cf7
Drive could not be hot-unplugged because it is not marked as unpluggable
vbd: 28a7fe9c-8a28-4433-c60f-fd258fb01cf7

xe vbd-plug uuid=28a7fe9c-8a28-4433-c60f-fd258fb01cf7
You attempted an operation on a VM that was not in an appropriate power state at the time...
After exhausting all the software troubleshooting options, I began to suspect the underlying hardware was to blame.
Getting Remote Access to Check Hardware
As I mentioned in my previous article "Reviving Remote Access to Legacy Supermicro Servers", my homelab relies on an aging but rock-solid Supermicro X9DRW server. This workhorse has been running 24/7 for years with a mix of older 500GB system drives in RAID1 and newer 14TB data drives also in RAID1.
After following the steps in that article to regain access to the server's remote management capabilities, I was finally able to connect to the BMC using JViewer. This gave me direct access to the server's console during boot—the first critical step in diagnosing what was happening at the hardware level.
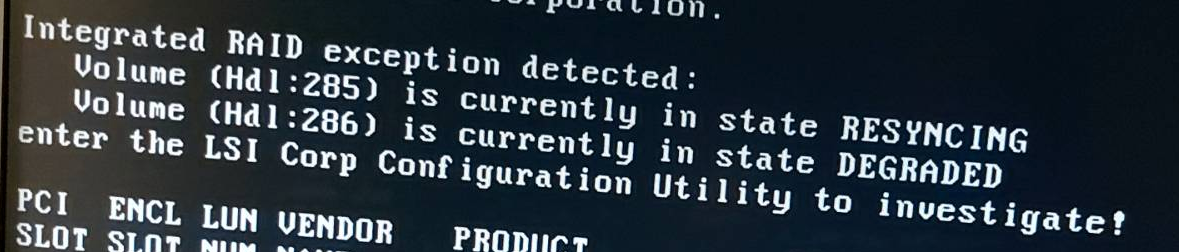
The Boot-Time Discovery
When the server rebooted, I was greeted with a concerning message from the RAID controller BIOS:
Integrated RAID exception detected:
Volume (Hdl:285) is currently in state RESYNCING
Volume (Hdl:286) is currently in state DEGRADED
enter the LSI Corp Configuration Utility to investigate!
This was my first confirmation that the issue was indeed at the hardware level. Both of my RAID volumes were in a problematic state—one resyncing and one degraded.
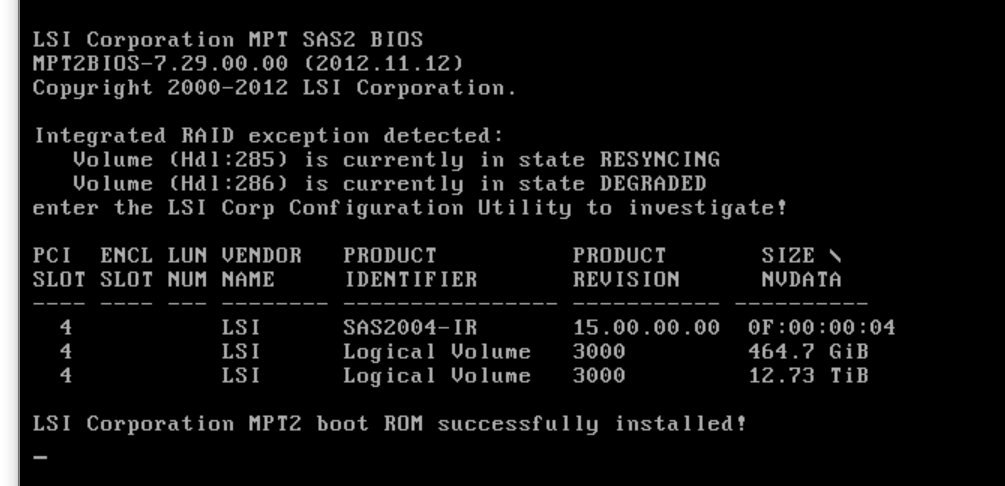
Diving into the RAID Configuration Utility
Using the remote KVM console, I pressed Ctrl+C during boot to enter the LSI configuration utility. The utility confirmed what the boot message had indicated:
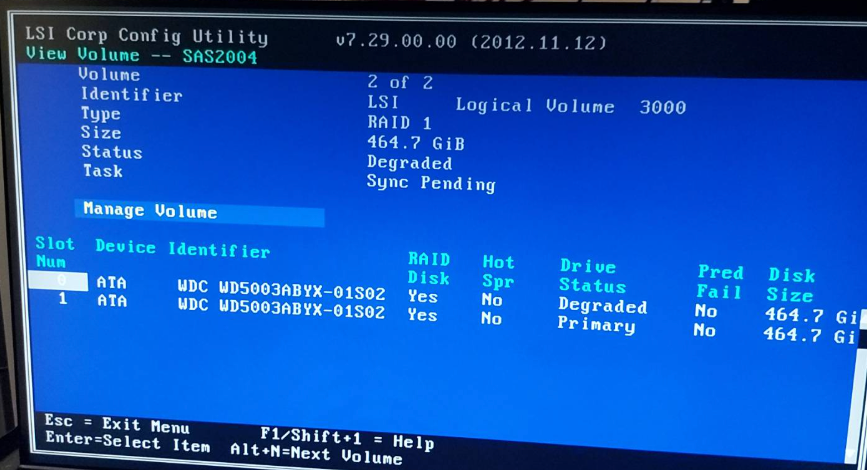
The first volume (my 500GB system drives) was showing:
- Status: Degraded
- Task: Sync Pending
- One drive marked as "Degraded" (WDC WD5003ABYX-01S02)
When I switched to the second volume, the situation was equally concerning:
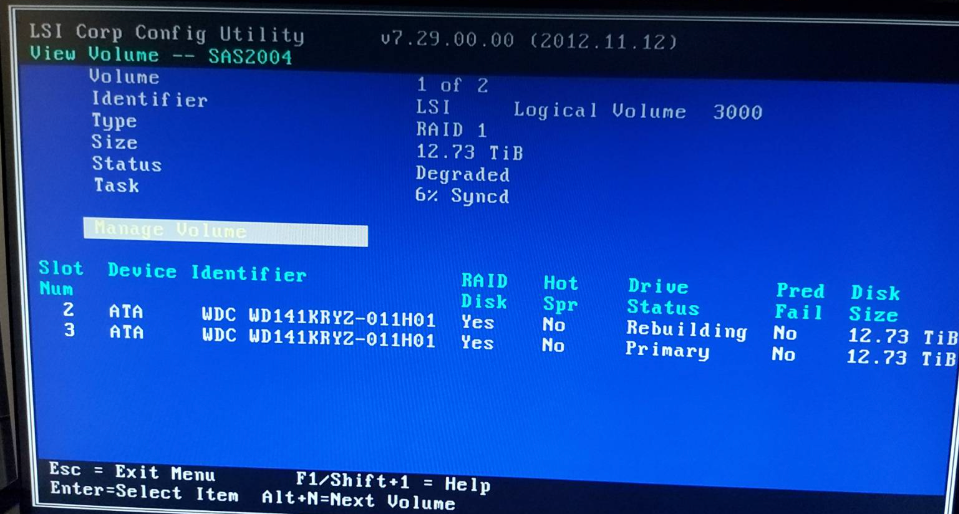
The second volume (my 14TB data drives) was also showing:
- Status: Degraded
- Task: 6% Synced
- One drive in "Rebuilding" state (WDC WD141KRYZ-011H01)
This validated my suspicion that deleting those old snapshots had somehow triggered catastrophic I/O operations that impacted both RAID arrays simultaneously.
Finding the Right Tools for Monitoring
After rebooting and allowing the server to continue its RAID rebuilding process, I needed a way to monitor the progress from the operating system level. My server uses an LSI SAS controller (specifically, a SAS2004 chipset), which requires specific utilities to interact with. The standard tool for these controllers is sas2ircu, a command-line utility that allows for detailed interrogation and management of LSI SAS RAID controllers.
Finding this tool proved to be another challenge, as it's not typically included in standard repositories. I eventually found it in Lenovo's server management package:
wget https://download.lenovo.com/servers/mig/2016/07/07/4958/lsi_utl_mpt2sas_sas2ircu-20.00.00.00_linux_32-64.zip
unzip lsi_utl_mpt2sas_sas2ircu-20.00.00.00_linux_32-64.zip
cd lsi_utl_mpt2sas_sas2ircu-20.00.00.00_linux_32-64/
cd sas2ircu_linux_x86_rel/
chmod +x sas2ircu
Monitoring the RAID Rebuild Process
With sas2ircu in hand, I began investigating the controller status:
./sas2ircu listThis command revealed all LSI controllers in the system, confirming that the controller itself was still detected.
Next, I checked the detailed status of the first controller:
./sas2ircu 0 displayThe output matched what I had seen in the BIOS utility, but with more details on the physical drives. For a more concise view of the rebuild progress, I used:
./sas2ircu 0 statusWhich showed:
IR Volume 1
  Volume ID                               : 285
  Current operation                       : Synchronize
  Volume status                           : Enabled
  Volume state                            : Degraded
  Volume wwid                             : 0b056f300d1af30e
  Physical disk I/Os                      : Not quiesced
  Volume size (in sectors)                : 27341795328
  Number of remaining sectors             : 2596726272
  Percentage complete                     : 6.50%
The Root Cause
It was now clear what had happened: The deletion of old snapshots had triggered intensive I/O operations on the already failing 500GB system drives. This caused one of the system drives to finally fail completely, putting that RAID volume in a degraded state.
Even more concerning, for reasons known only to the RAID controller firmware, this event somehow triggered a rebuild operation on my 14TB data volume as well, despite those drives being much newer and presumably healthier.
This explained why virtual machines were failing to start or experiencing I/O errors - the underlying storage was in an inconsistent state due to ongoing RAID rebuild operations.
The Solution
With the diagnosis complete, the solution became clear:
- Wait for both RAID rebuilds to complete (several hours for the 14TB volume)
- Replace the failed 500GB system drive
- Create a monitoring script to catch these issues early in the future
I decided that step 3 was the most critical for long-term stability. Even with new hardware, RAID controllers can experience issues, and early detection is key to preventing data loss.
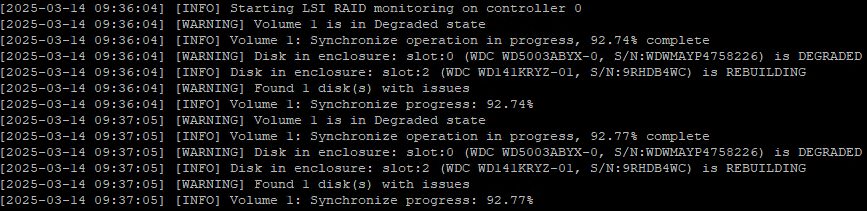
Developing a Monitoring Solution
To prevent future surprises, I developed a Bash script that monitors the LSI RAID controller status and alerts on any issues:
# LSI RAID1 Monitoring Script for XCP-NG
# This script monitors LSI RAID controller status and alerts on issues
# It also provides progress updates during rebuild/synchronization operations
The script periodically checks:
- The status of all RAID volumes
- The state of all physical disks
- Ongoing rebuild operations and their progress
When it detects problems like degraded volumes or rebuilding disks, it logs warnings and can send email alerts to notify me before the situation becomes critical.
Currently, the script runs from the command line, but I plan to enhance it with email notifications for automated monitoring. The key thing is that it catches issues early, before they affect my virtual machines.
Installation and Basic Usage
To use the monitoring script:
- Download and extract the
sas2ircuutility as shown above - Save the monitoring script to a file (e.g.,
raid_monitor.sh) - Make the script executable:
chmod +x raid_monitor.sh - Run the script in a terminal:
./raid_monitor.sh
For continuous monitoring, you can run it in the background:
nohup ./raid_monitor.sh > raid_monitor.log 2>&1 &Or set it up as a cron job to run at regular intervals.
Lessons Learned
This experience taught me several valuable lessons for homelab maintenance:
- RAID is not a backup - even with redundancy, controllers can make unexpected decisions that affect all drives
- Regular monitoring is essential, even for supposedly reliable hardware
- Aging disks may fail in cascading patterns - when one goes, others may follow
- Always have the right diagnostic tools available before problems occur
- Seemingly routine operations (like deleting old snapshots) can trigger catastrophic failures in stressed systems
Most importantly, I learned that even in a homelab environment, proper monitoring is not optional - it's essential for preventing data loss and minimizing downtime.
Accessing the Tools
The sas2ircu utility can be challenging to find as vendors often move or remove these packages. For my subscribers, I maintain a copy of this essential utility in case it disappears from vendor websites, ensuring you'll always have access to the tools needed for diagnosing similar issues.
Coming soon for subscribers: The complete monitoring script and SAS2IRCU to keep your homelab RAID systems under watchful supervision.
Has your homelab ever experienced mysterious failures? Let me know in the comments below, or consider supporting this blog to help keep these technical deep-dives coming.
Buy Me a Coffee
Fuel my creativity with a coffee — every sip keeps this blog running!

Support This Blog — Because Heroes Deserve Recognition!
Whether it's a one-time tip or a subscription, your support keeps this blog alive and kicking. Thank you for being awesome!
Tip OnceHey, Want to Join Me on This Journey? ☕
While I'm brewing my next technical deep-dive (and probably another cup of coffee), why not become a regular part of this caffeinated adventure?
Subscribe


